
In this Illustrator tip, I will show you how to create interlocked or interconnected text. So let me tell you how:
Step 1:
Quickly type down the text with the Type Tool (T) that you want to interlock, I wrote "abcde".

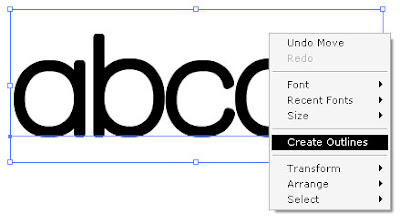
Step 2:
Select the text with Selection Tool (V) and Create Outlines (Type > Create Outlines or you can right click on the text and choose Create Outlines). After that select the outlined text again and Ungroup it via Object > Ungroup.
Step 3:
Now change the fill colors of the text and arrange them with the Selection Tool (V) in the way you want them to interlock.

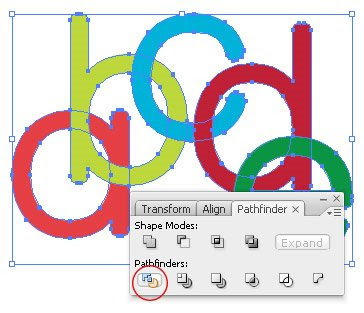
Step 4:
Select all the text with Selection Tool and in the Pathfinder Palette click on the Divide button, highlighted with the red circle in the image below.
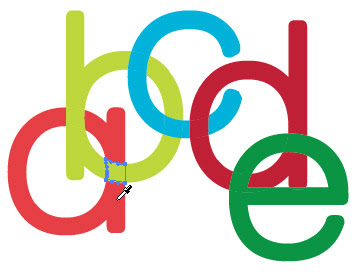
Step 5:
And, now you are almost there, select the section of the text with Direct Selection Tool (A) that you want to overlap and click with Eyedropper Tool (I) on the fill color (make sure fill is active on the color swatch) of the text that that you want to be overlapped or matched.
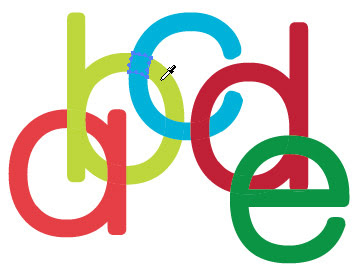
Step 6:
Since we have divided the text, our text is in bits and parts you may want to join them together, so after you are done overlapping the text, with the Direct Selection Tool(A) click on one of the alphabet and goto Object > Same > Fill Color and then choose Object > Compound Path > Make . Repeat this for all the alphabets.
Alternatively, you can also Merge the entire text after Step 5, to do that just select the entire text with Selection Tool (V) and from Pathfinder Palette choose Merge.
And, that's about it... all your text is interconnected! Quite easy, right!!

Jean-Claude Tremblay (in the comment below) also suggested a nice method with Live Paint here is how I think it can be done:
1. Follow all the steps mentioned above till Step 4
2. After that, select the entire text and goto Object > Live Paint > Make
3. Now select the fill color and the part of text that you want to be overlapped and with the Live Paint Bucket Tool(K) fill the color.
I like that in Illustrator there are more ways of doing things!! :)


9 comments:
It’s cool, but It would have been far better if the interlocking object was turn into a livepaint group. It would have give you a lot more flexibility.
@Jean-Claude Tremblay: That definitely is a great idea, thanks for the tip. Appreciate your comment. :)
If you look closely, there is a white space in d and a where the other letter was suppose to be.
Thanks a lot. I liked ur tutorial.
@Jean-Claude Tremblay: I didn't get ur idea; about using a live paint group. Would u clarify more??
@poisson: I get what you mean, I have added a additional Step 6 to fix the problem you said. Hope that helps. :)
@Ghada: Glad you liked the tutorial :)
As for working with live paint:
1. Follow all the steps mentioned above till Step 4
2. After that, select the entire text and goto Object > Live Paint > Make
3. Now select the fill color and the part of text that you want to be overlapped and with the Live Paint Bucket Tool(K) fill the color.
can someone please tell me the font,i love it.
I believe the font is called "report regular" - You can find it here: http://new.myfonts.com/fonts/typodermic/report/regular/
shift + control + F9 brings up the pathfinder palette
Great tutorial, easy to follow and such a good effect thank you
Post a Comment
Hello and welcome to Musings! If you like the article you just read you can subscribe here to get updates via RSS or opt to have them sent directly to your inbox.
I appreciate your feedback so please feel free to comment.